Horizon Forbidden West, out now for PlayStation 4 and PlayStation 5, is the size of a dinosaur. Like any big game, it’s a whole lot to take in, and can be overwhelming at times. You can and indeed should figure out a lot of its quirks and secrets on your own. But take it from me, someone who’s veering on 60 hours in Guerrilla’s striking robot apocalypse: The following tips and tricks are what I wish I knew from the jump.
Read up on the lore background if you need to
Horizon Forbidden West hits the ground running, with the narrative picking up just a matter of months after its predecessor, Horizon Zero Dawn. Even if you’ve played that game, and even though Forbidden West starts with a brief refresher, you might find yourself riddled with questions, top-heavy with buried troves of lore as Zero Dawn was. Who’s GAIA? What’s Ted Faro’s deal? Why are all the machines shaped like dinosaurs? What’s an Erend? We’ve got you covered:
Read More: Everything You Need To Know About Horizon Zero Dawn’s Story Before You Play Forbidden West
Do everything in the starting area
Yes, the first real area of Horizon Forbidden West, the canyon outside Barren Light, is the most tedious and the least visually interesting area of the game. But fully completing every objective will give you a serious head start on entering the full open world. One side-quest contains a tutorial for underwater swimming, core to traversing Forbidden West. Another one gives you early access to the spike thrower, a slow-firing but high-damage weapon class. A third teaches you some essential climbing tricks, and gives you a nice haul of crafting resources that’ll start you off strong. If you’re diving cold into an open-world game, it’s likely completionism is in your nature anyway, but still: Leave no stone in that first area uncovered.
Head for the tallnecks
Horizon Forbidden West’s approach to clearing the fog of war is awesome. You don’t climb a tower. You climb a walking robot dinosaur. These roving behemoths, called tallnecks, are rare (there are just five) but essential. When you find one, you’ll have to knock out a side-quest, usually involving a brief combat or traversal sequence, before you can climb it. Also, a fair heads up: The second tallneck you come across, located in The Shining Wastes, isn’t something you can complete until close to the end of the game, so don’t waste your time.
There’s fall damage
And, yes, it hurts a lot. But! You’ll unlock a hang glider fairly early. If you open it just before you hit the ground, you’ll be totally fine.
Aloy will tell you when you can’t solve a puzzle
Many of Horizon Forbidden West’s environmental puzzles have hurdles you can’t initially get past. Some are gated off by metal flowers. Others are impeded by a reddish growth called firegleam. You’ll need to earn upgrades to Aloy’s spear before eliminating these obstacles, both of which you’ll unlock naturally during the story. But if you run into such puzzles before finding the requisite upgrades, Aloy will say something along the lines of, “I don’t think I can get past these vines.” Heed her word.
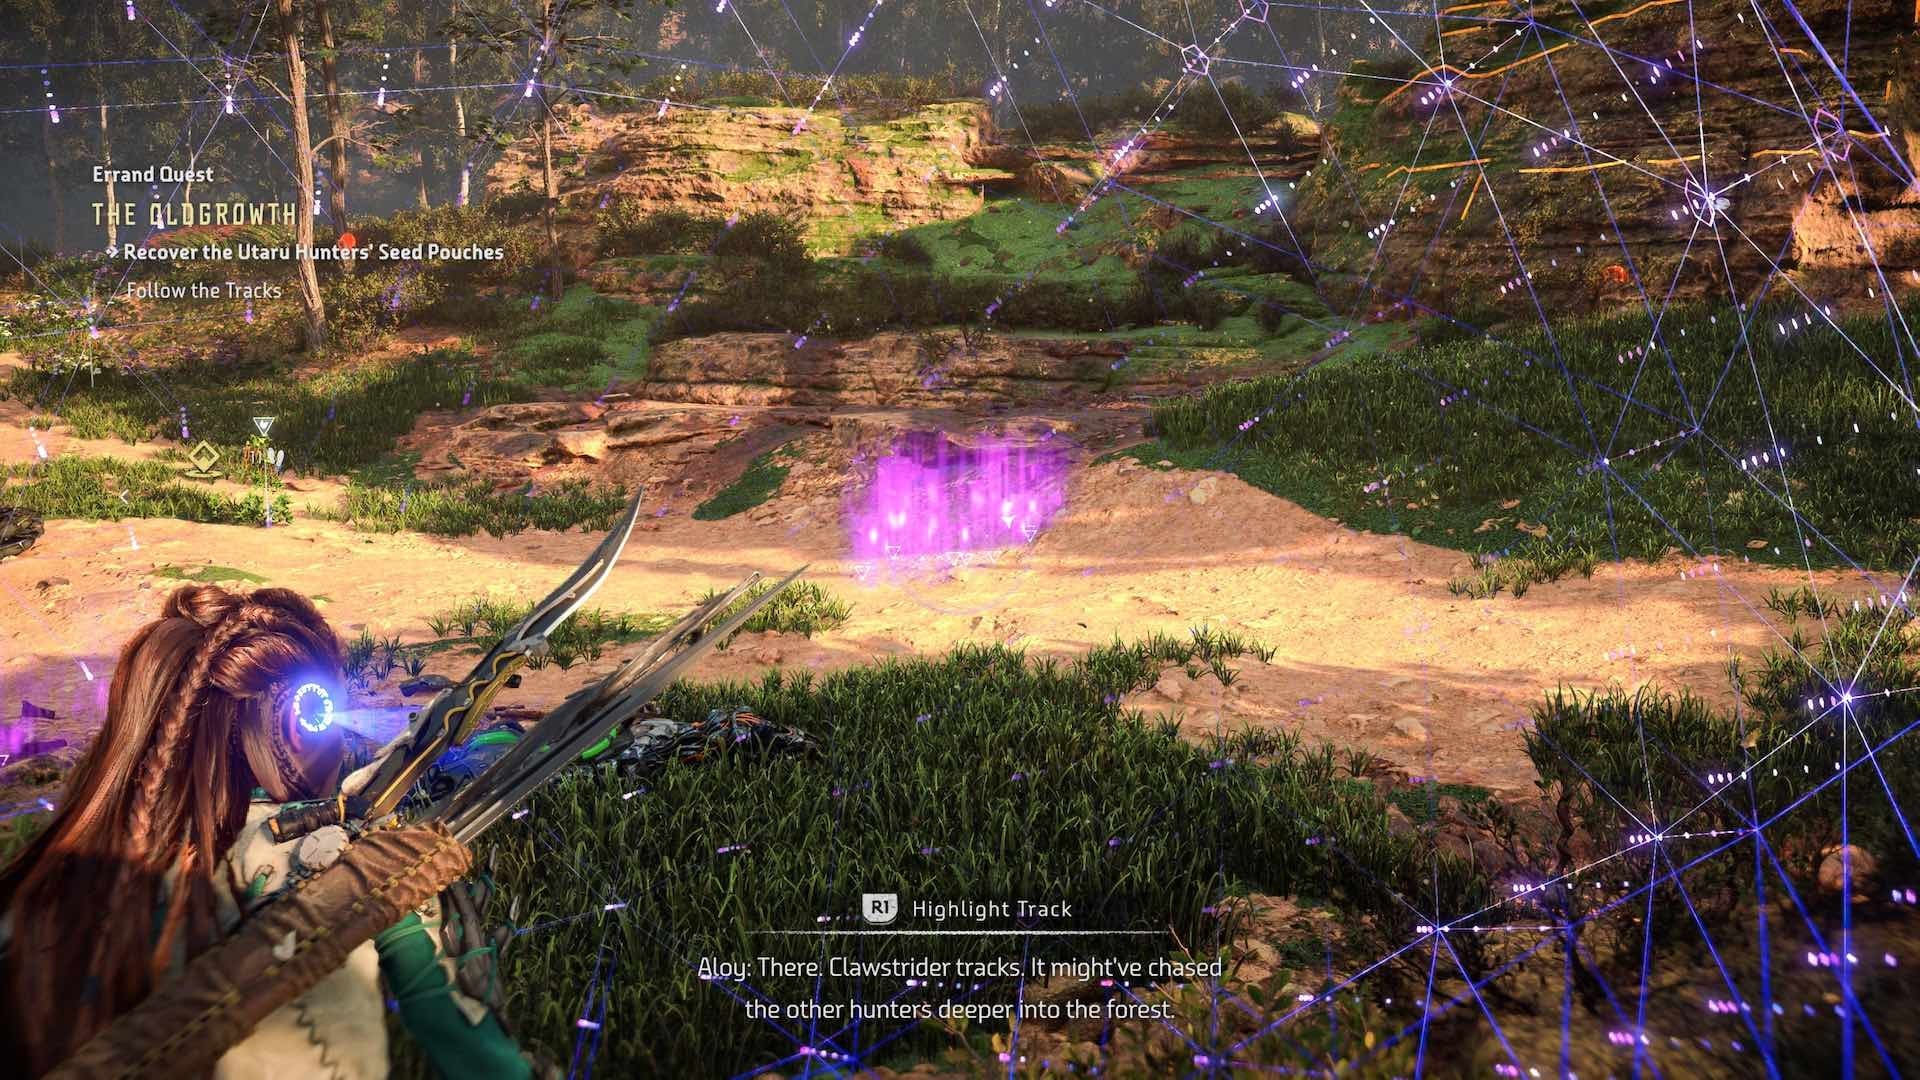
Use your Focus constantly
You’ll quickly come across a device called a Focus. You cannot possibly overuse it. Pressing in the right thumbstick will send out a pulse through your surroundings, highlighting objects of interest, like chests or climbing pathways, in orange. Hold in the thumbstick, however, and you’ll go into Focus view, where you can scan machines to identify weak spots and elemental weaknesses. Once you scan a machine, it’ll go into your notebook, where you can read up on strategies for how to defeat them and see a rundown of drop rates for their loot.
Talk to everyone
At camps, shelters, and settlements, you’ll often see NPCs with little green exclamation points hovering over their heads. If it’s just an exclamation point with no border, that character will give you a side-quest. But if it’s bordered by a diamond, they’ll tell you about a rumor, giving you the location of an optional activity. There are several categories to keep an eye out for:
Rebel outposts: Horizon Forbidden West doesn’t often pit you against human enemies, but if you’re tired of fighting machines (how???), here’s where you’ll find them.
Rebel camps: Basically the same thing as rebel outposts but bigger.
Relic ruins: Environmental puzzles that award two skill points and 5,000 XP upon completion.
Cauldrons: Platforming, combat-intensive dungeons that allow you to override certain machines, turning them into temporary allies or permanent mounts. (Cauldrons are long, and once you start one, you can’t leave until you’ve finished it.)
You can’t reassign skill points
You’ll earn skill points in Horizon Forbidden West at a rapid clip, but the game’s total lack of a respec feature means it’s all the more imperative to map out your build before allocating points. A select few abilities are playstyle-agnostic, and will help most folks. Prioritize unlocking stealth stalker (an invisibility cloak), overshield (an overshield), braced shot (an extremely powerful combat move), and various upgrades for your concentration (the ability to slow down time while aiming).
Read More: The 10 Best Skills You Should Get ASAP In Horizon Forbidden West
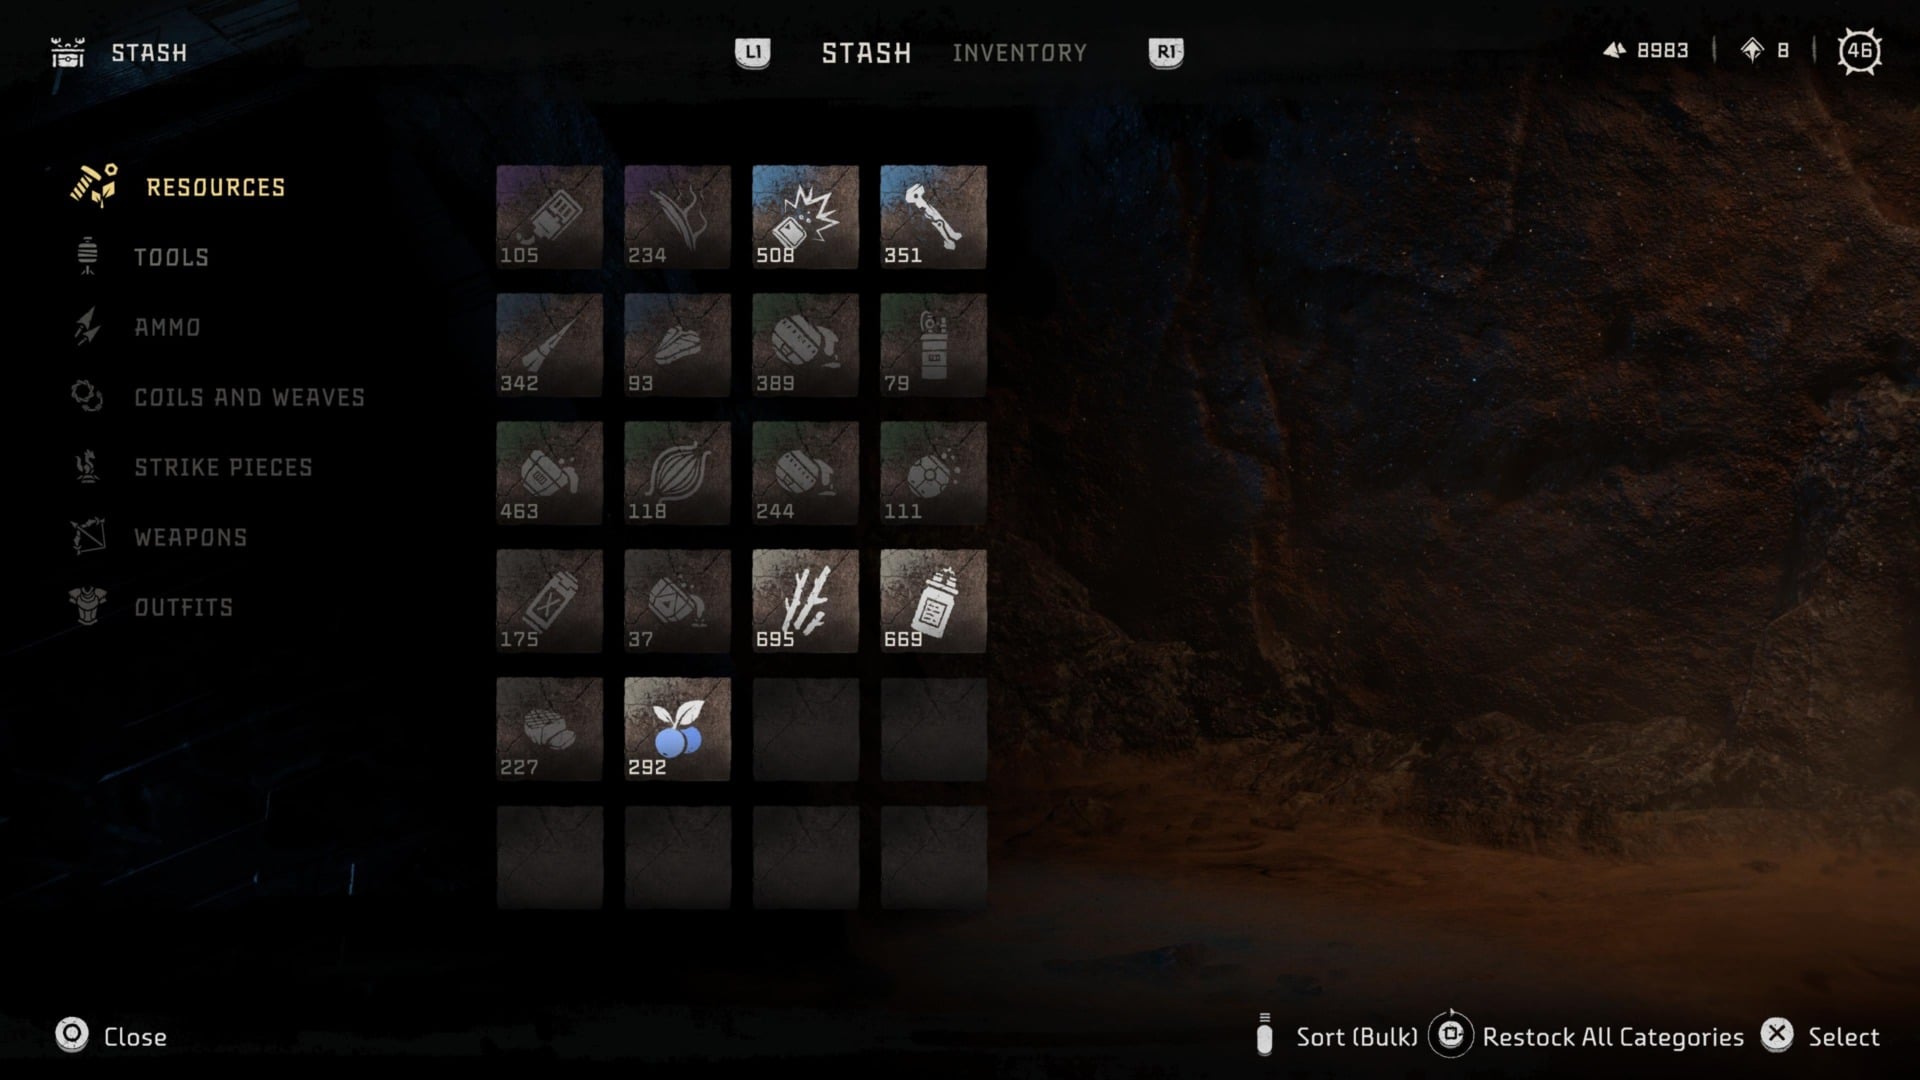
Loot everything
Seriously: everything. One of Horizon Forbidden West’s best features is the stash. You technically have limited storage capacity on your person, but any resources you loot beyond what you can carry will automatically go into your stash, which you can visit at every shelter and settlement. You can then automatically replenish all depleted resources by interacting with your stash and holding down the Square button. In other words, there are literally zero repercussions for looting everything in sight
But don’t get your hopes up for any gear
It took me a while to realize this, but you likely won’t find any usable gear from looting in Horizon Forbidden West, not like you would in other inventory-focused open-world games. Chests and caches tend to only contain crafting resources, valuables for resale, and shards (Horizon’s in-game currency). Some of those resources are rare and essential, so yes, it’s still worth thoroughly exploring every dungeon and scrounging everything you can. Just don’t expect to find a killer new weapon or a high-level set of armor. In my experience, those only show up at vendors or come as rewards for missions.
Sell your valuables
When selling items, if you scroll down to the resources section, the first category that pops up is valuables to sell. You can mark everything by hitting the Triangle button, and then quickly sell it all by holding down X.
Different vendors have different wares
You’ll come across dozens of vendors in Horizon Forbidden West, most of whom have unique inventories; the armorer in, say, Thornmarsh will have totally different gear for sale than the one in Plainsong. It’s a lovely distinct touch that makes Horizon’s forbidden west feel like a real place—shops in the real world don’t all hawk the same stuff, after all—but keeping track of who’s selling what can be a lot. Throw in the mix that gear doesn’t just cost you shards. Each item also requires a specific machine part
You could keep an IRL journal, but an easier trick is to create a job for every item you want, essentially marking a low-tier side-quest that’ll help you source the necessary materials. When you see an item you want but can’t afford, hit the Triangle button to create a job for that piece. Then, when you eventually get the resources needed to purchase the item, the precise storefront you saw it at will be marked on your map and in your quest log.
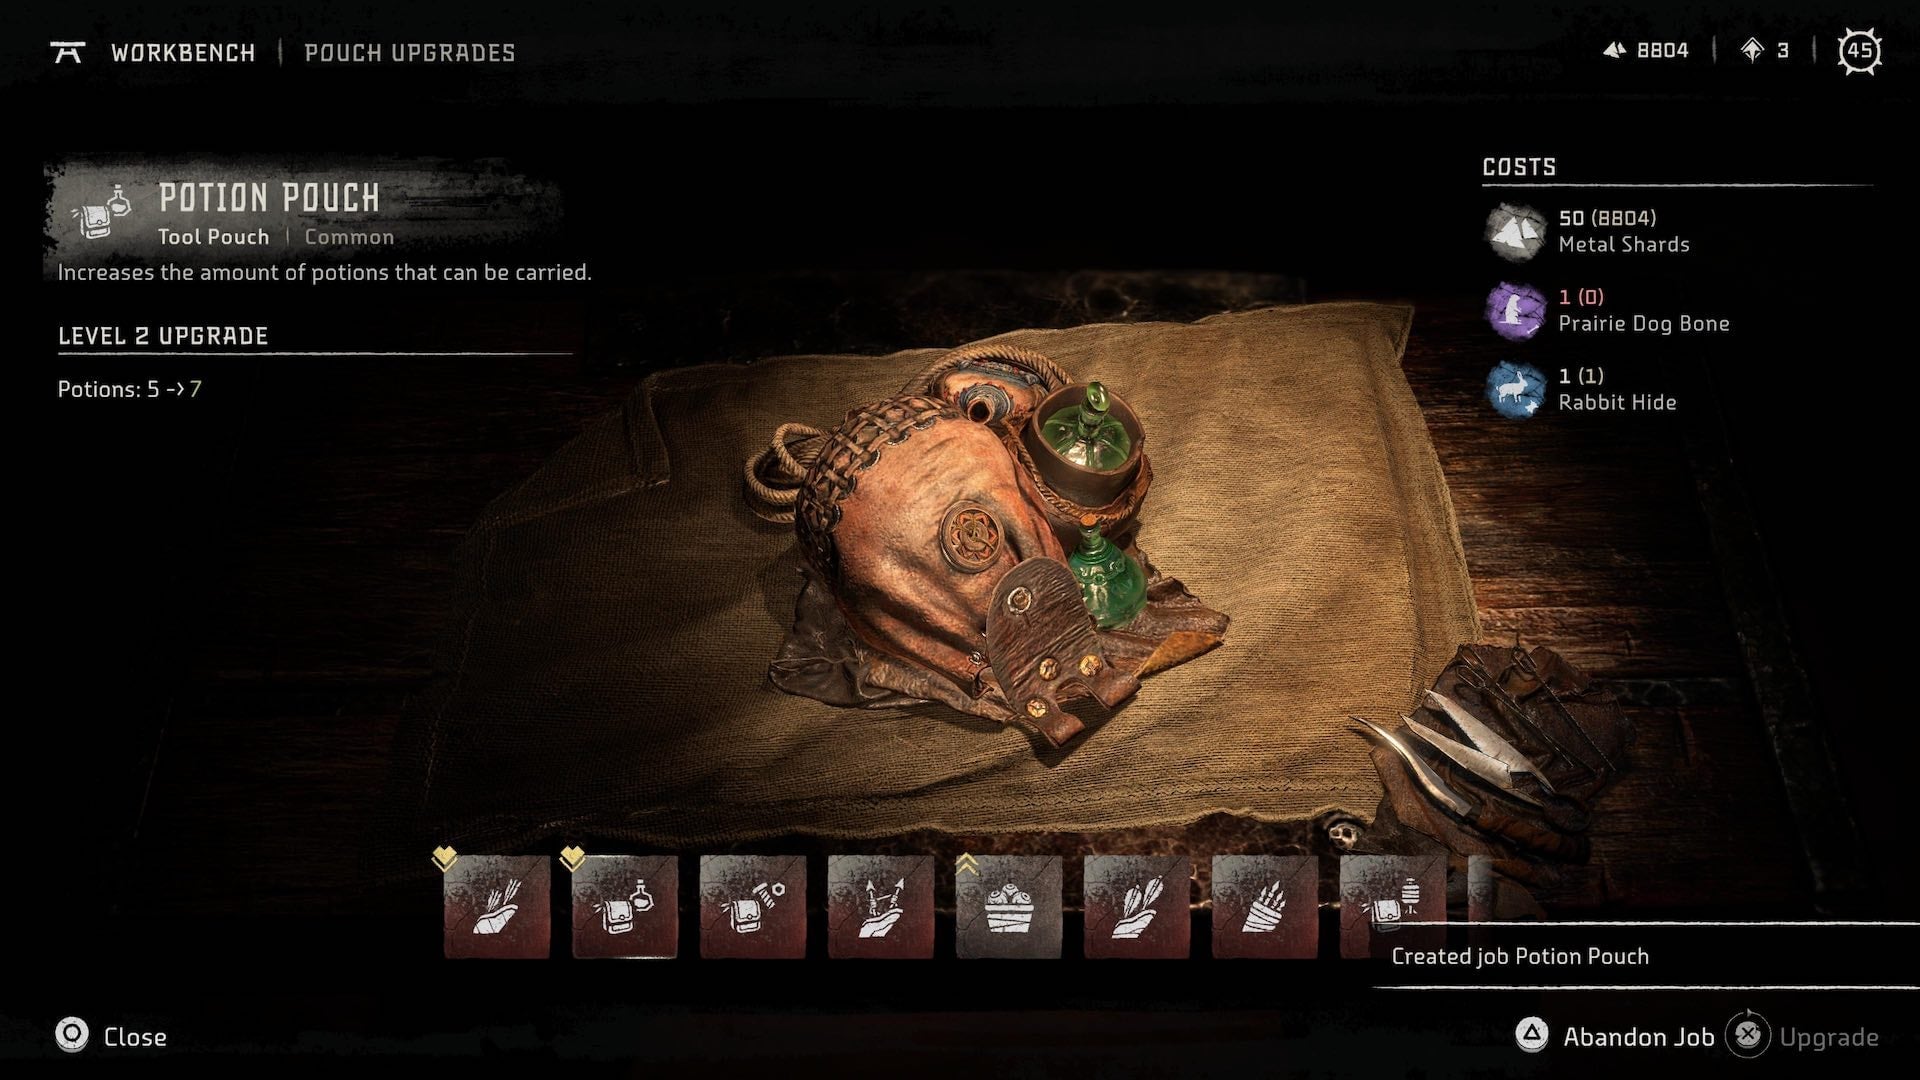
Create jobs for pouch upgrades
Look: it’s among my least favorite aspects of Horizon Forbidden West too, the foxes are so dang cute and weren’t hurting anyone, but if you want to increase the size of your quivers and item pouches, you’ll have to hunt non-robot animals. At any workbenches, you can create jobs for any quiver or pouch that needs upgrading. When you activate those quests, they’ll show you the broad area of where that animal lives. Once you’re in the area, just activate your Focus and scan nearby animals (shown as vivid orange silhouettes in your field of view), then tag the one you need with a tap of the right trigger. That’ll put a handy arrow over their head for easy tracking.
Upgrade your warrior bow’s capacity first
Warrior bows are among the most helpful weapons in your toolkit. They’re not great for dealing damage, but are terrifically helpful when it comes to afflicting a status effect—burning, shocking, freezing—on an enemy. Typically, you need to land half a dozen elemental arrows to trigger the status effect. The trick of the warrior bow is that you needn’t draw the string back all the way to get a shot off; you can fire off a bunch of elemental arrows in a matter of seconds. You’ll need a lot of ammo on-hand to realize its full potential, though, so beef up your capacity there first.
Aim for canisters
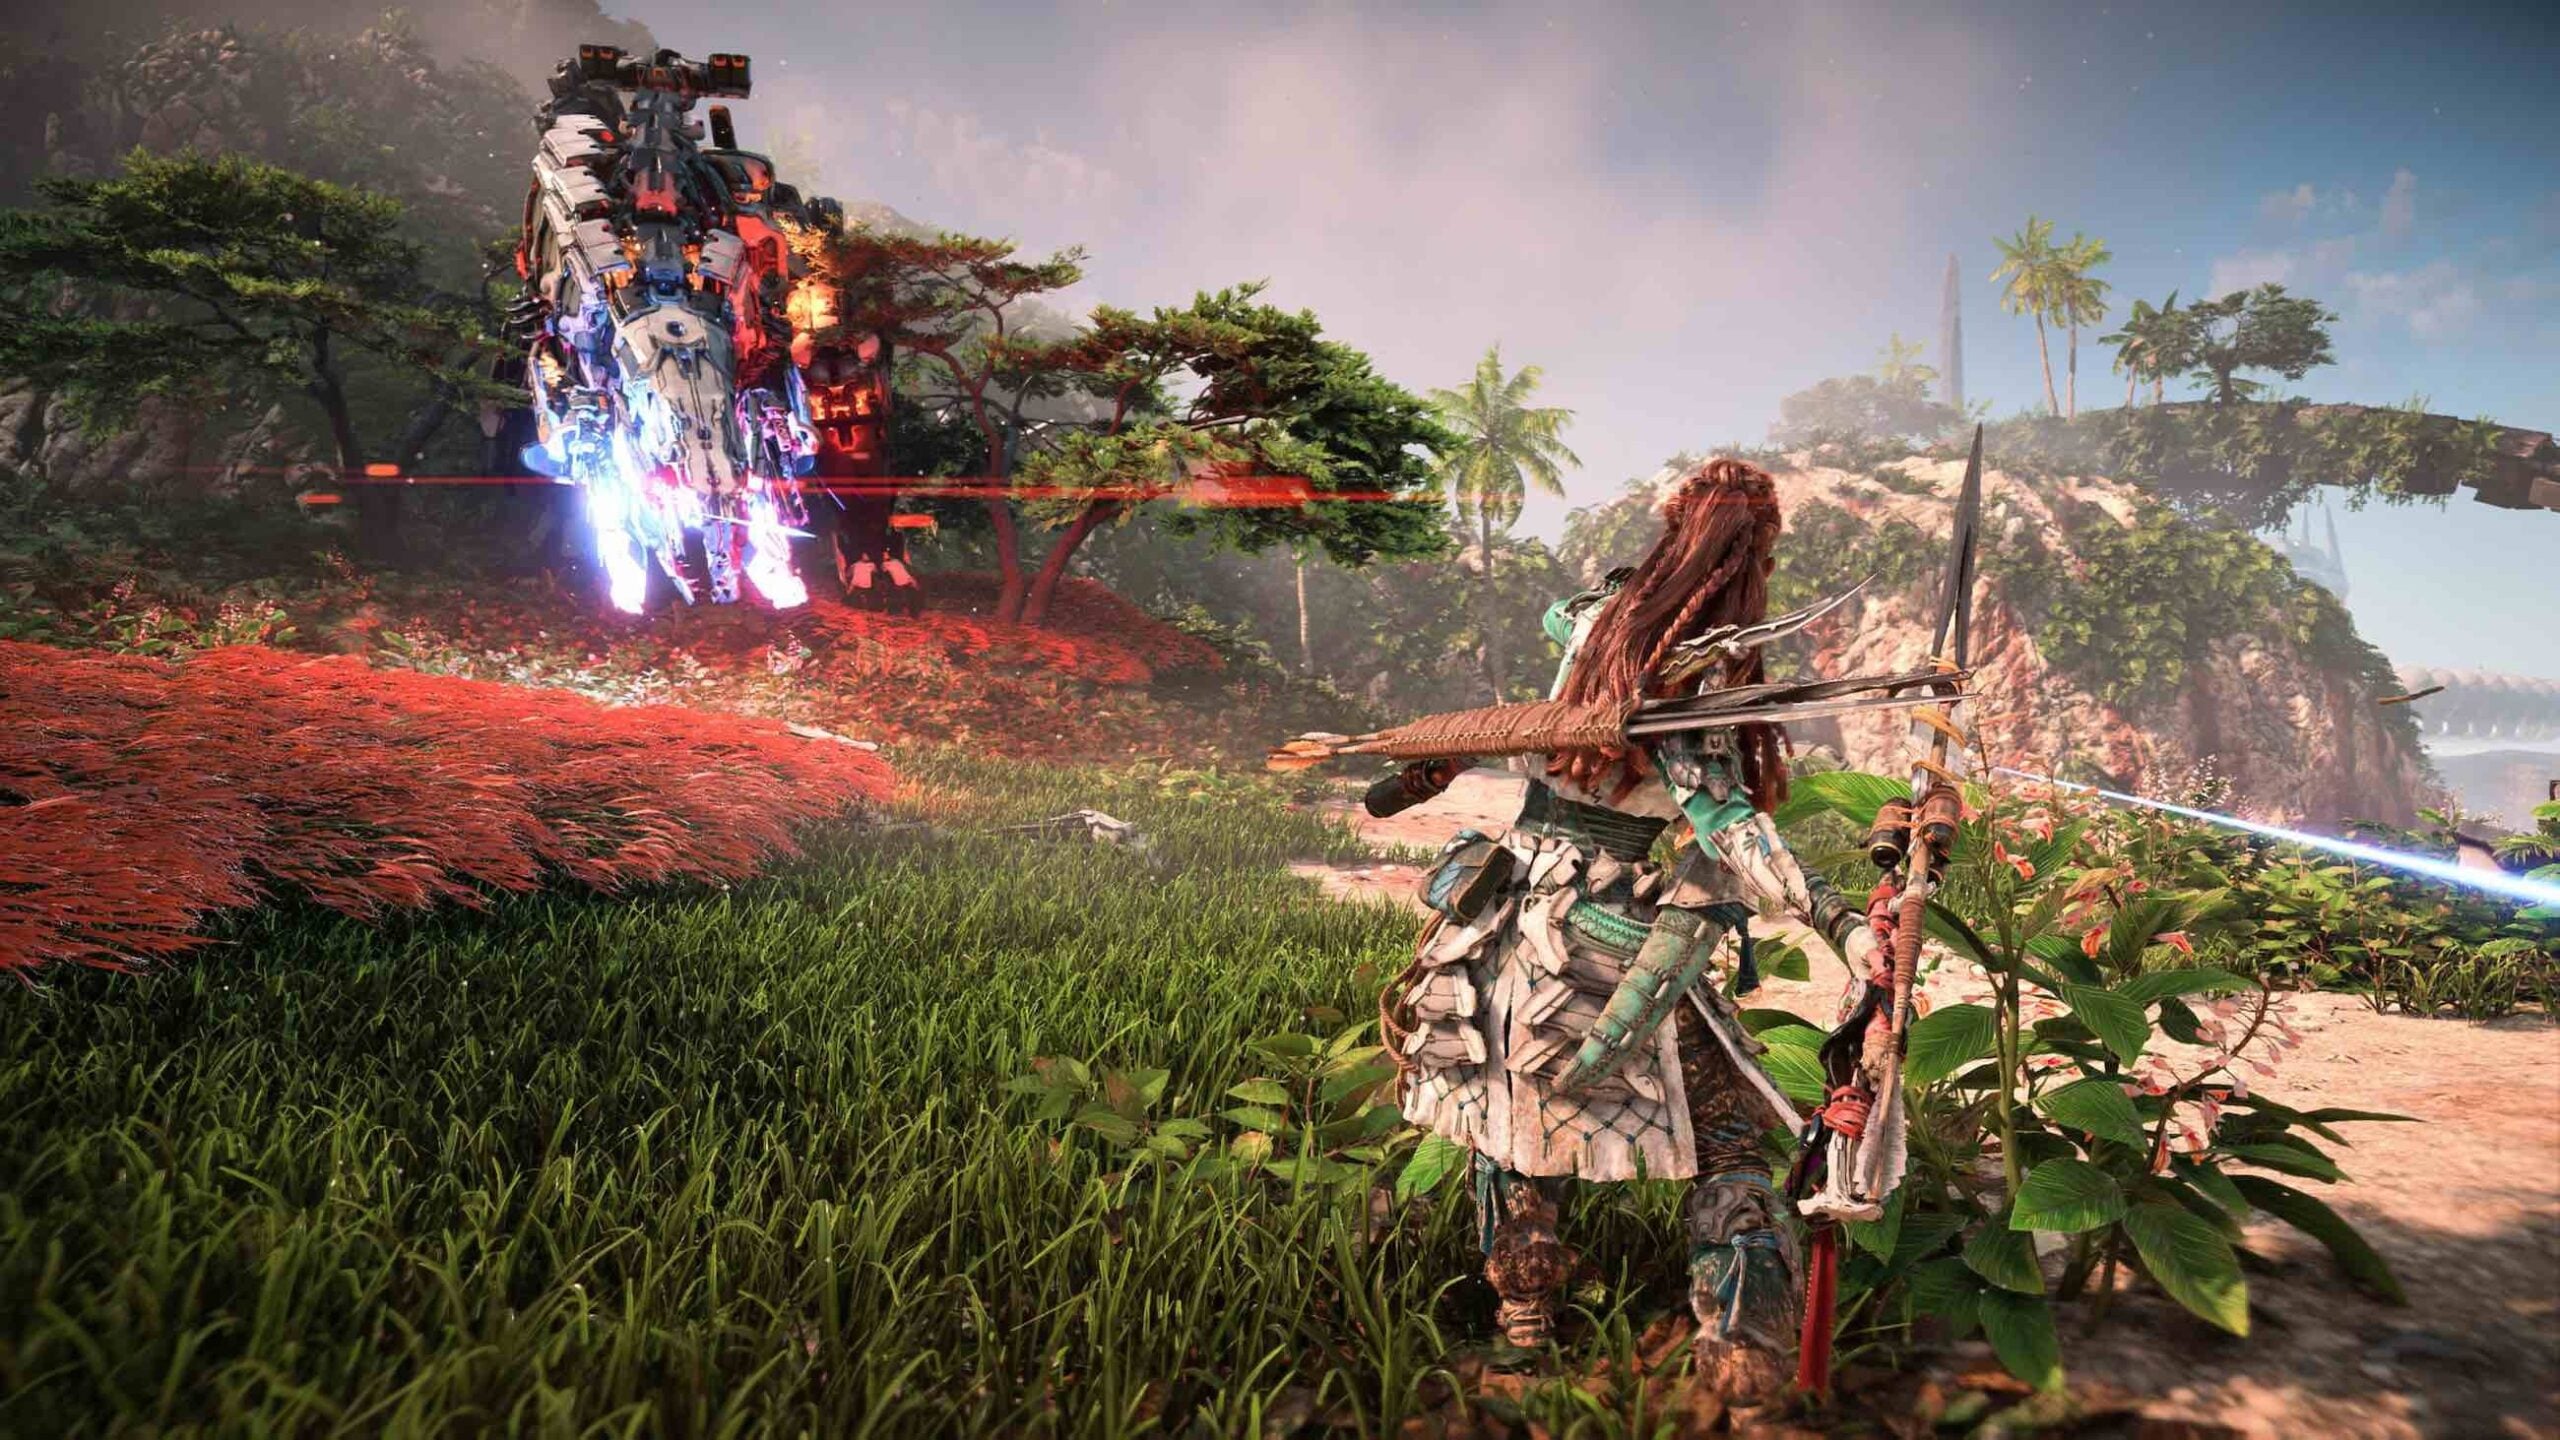
Machines are often saddled with elemental canisters corresponding to one of Horizon Forbidden West’s primary elements. You can cause these canisters to explode, dealing massive damage, by hitting them with an arrow imbued with the same element. Hit green canisters with acid arrows, orange ones with fire arrows, light blue ones with frost ones, dark blue ones with shock arrows, and purple ones with plasma arrows
You can put canisters on enemies
You can attach your own canisters to machines by finding, and equipping, one of Forbidden West’s rare canister ropecasters. (I only found two over my playthrough.) Typical ropecasters are used for tying frenetic machines down, ensuring they’re stuck in one spot for a few seconds. But canister ropecasters allow you to affix these elemental payloads onto machines. If you have a canister ropecaster plus a warrior bow that shoots arrows of the same element, you’ll be unstoppable.
Stay stealthy
Most battles in Horizon Forbidden West give you the advantage. You start unseen, allowing you to scan enemies, tag them, and highlight their walking routes. (Enemies in Horizon patrol in circles. Yeah, not too bright for supposedly society-eliminating machinery.) If you crouch in red grass, enemies won’t spot you, even if they’re literally standing two feet away. You can then try to place traps in their path and duck back into cover. Your best bet here is to match traps to their elemental weakness. Or just use a blast trap, which is exactly what it sounds like.
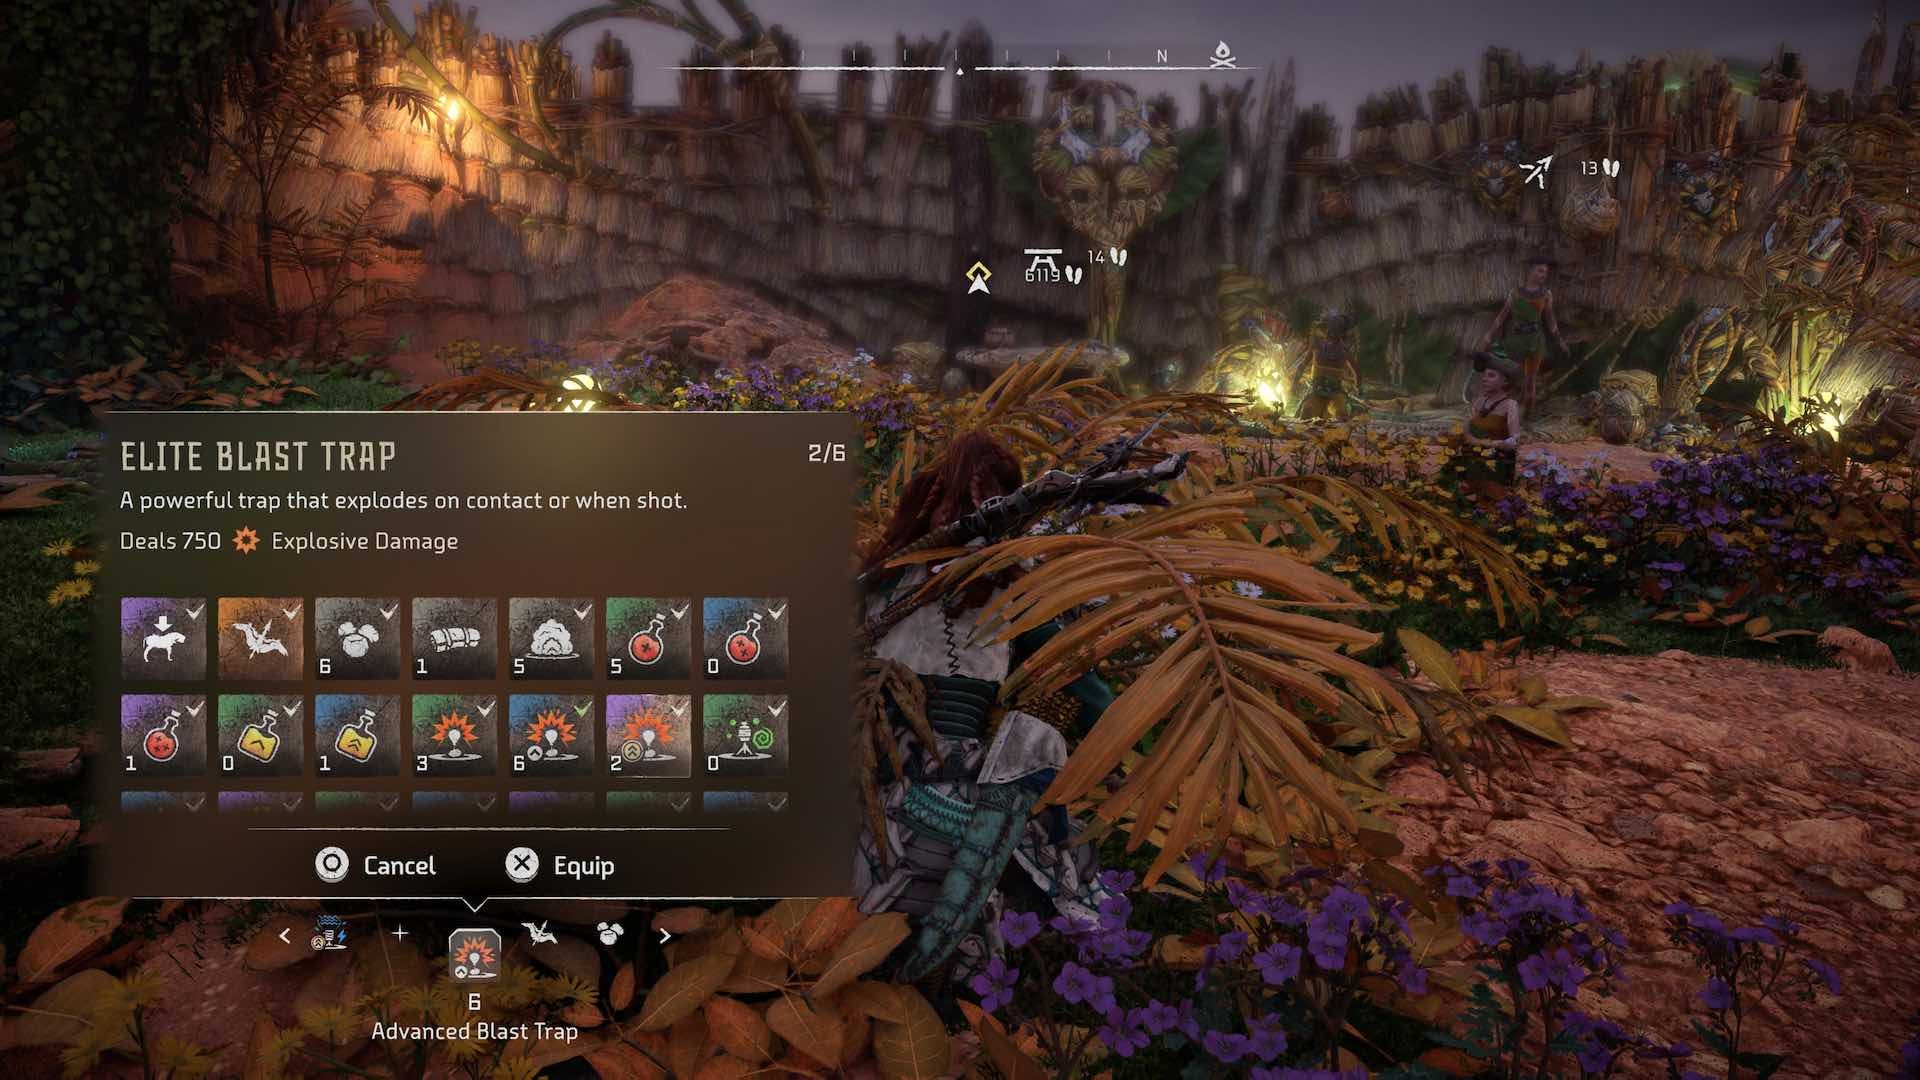
Craft traps on the fly
You can make traps at various crafting benches, but you can also do it at any point in the open world, even in the middle of combat. By holding down on the directional pad, you’ll open the crafting menu. You can use the right and left arrows to scroll through your list of craftable items. But pro tip: Pressing the square button will pull up a handy menu that’s far less time-consuming to navigate.
Start in the desert
No spoilers here, just a recommendation: After Horizon Forbidden West’s first act break, you’ll be able to tackle three main missions in any order you please. One’s at level 18, another at level 22, and a third at level 24. It might sound intimidating, but start with the level-22 mission, set in the dust-covered ruins of Las Vegas. You’ll unlock the ability to swim underwater without resurfacing for oxygen, which is invaluable for many missions—both primary and secondary—throughout Forbidden West
Play “Machine Strike”
“Machine Strike,” an entirely optional turn-based tactical mini-game, is well worth your time, and not just because it’s a dangerously engrossing time sink. You can go up against every in-game player three times, with each board featuring a different layout. (Read more about how it works here.) You don’t get any XP for defeating opponents. You barely get any shards. But if you rout them on all three boards, you’ll earn two free skill points.
Also: It’s a blast.

Use the map’s great hidden navigational tools
Horizon Forbidden West’s map may look intimidating, what with its scale and glut of icons, but it sports a variety of features that make it easier to navigate.
You needn’t scroll through your quest log to designate an active quest. Hover over the icon of a nearby mission, shown as a bolded white quadrilateral, and press square to make that your active task.
Icons are handily color-coded. White icons are points of interest. Yellow ones are points you’ve actively marked as a headway. Blue icons refer to activities—like mini-games or tallnecks—you haven’t yet completed, while green ones indicate activities you’ve completed.
Press the options button (the one with the hamburger icon on your DualSense controller) to pull up a list of 20 activity categories. You can then press square to deactivate everything, clearing the map of icons entirely, and then go through the list, re-adding only those you care about. Note, however, that you can’t void the map of markers for uncompleted quests.
Open the Arena ASAP
Fairly early on, around level 18 or 20, you’ll get a side-quest that asks you to open Horizon Forbidden West’s Arena. Do so the second you can. Not only is the Arena thoroughly awesome—pitting you against waves of dinobots in various, increasingly challenging parameters—but it also allows you to unlock some of the best bows and armor sets in the game.
Let yourself get lost
You can customize all sorts of navigational settings, activating tools like headways and markers and indicators that make traversing Horizon Forbidden West a bit more of a streamlined process. That’s all well and good, and can certainly help you focus in a bold, distractingly beautiful world. But every now and then, let yourself get lost a bit. You never know what you’ll find.